There are more reasons to read, and let your geekiness show!
And if you want to make a Dwarf costume, I'll help make it so!
Well, now that my rhyming is done, I'll show you how I put together Jim's dwarf costume that he wore to the Hobbit midnight premiere! (By the way, if you were wondering, it was AMAZING!! I'm slightly biased, but still - I loved it.)
First, I have to credit Pinterest for helping me keep track of everything. My board for these costumes can be found here, where I kept all of the resources I knew I'd be needing.
Dwarven Chainmaille:
(No fowarding before midnight for luck required)
I was very inspired by this tutorial for chainmaille from soda tabs, posted by quixotiCfluX on instructables.com. He takes you through the process step by step with great pictures.
Here is what you will need:
So, to start, you'll need soda tabs. Lots and lots and lots of soda tabs.
I started a bowl of them early on, and asked all my friends to contribute, while scavenging as much as I could. You'll also want a staple remover in order to bend the tabs so they all fit nicely together. Then a wire cutter, to cut the top part of the soda tab so you can weave them together.
Stick the tab in the staple remover and push down on it, so it bends in the middle.
This helps them lay next to each other and to connect neatly together.
Then, use your wire cutter to snip the middle bit of the top, and slide the top of one tab into a side of the bottom hole. Then keep adding until you start to get shapes to them.
I knew I wanted to have chainmaille along Jim's arms, so I measured around his arm and left a few inches gap along the opposite side of the sleeve so it would stretch a bit.
After a while of watching MythBusters and working at it, I had a pretty good amount done!
I'm sure the kittens thought they were helping.
I knew that I wanted it to cover half his hand and go around his thumb, so I made thumb holes!
After some consideration, I realized that I wanted some on his hand, and some on his upper arm. So I split them in half, and using the sleeves from a long thrift store t-shirt (cutting thumb-holes in them as well), I taped them into place in order to sew them on. I hand stitched with black thread, and peeled away the tape as I made my way around.
Sewing around the wrist was a little more complicated, as I need to shape it to his hand, so he had to wear it while I sewed. I was very careful and only stabbed him a few times - no matter what he says.
The best way to make sure the tabs stayed attached to the sleeve was to bring the needle up right next to the edge, then bridge the gap with the needle and go back down right next to the other edge.
Leather Bracer:
A 'bracer' is basically an arm-guard, and with all the leather scraps I picked up at a thrift store for $5, I knew I could easily whip up two of them. I thought about embossing them with celtic designs, but that required far more skill than I had, so I left them plain.
I cut out the shapes that I wanted, then marked where I wanted the eyelets for the laces.
Then I used my awesome leather hole puncher to poke holes where marked...
Placed the eyelets in the holes...
And since I didn't want to buy the $25 kit that opens up the eyelets for you, I improvised with some needlenose pliers to flatten them out.
Once all the eyelets were secured, it looked pretty darn good, if I do say so myself.
Tunic:
Now after staring at the Hobbit production photos for hours, it still didn't help me figure out what kind of tunic would be appropriately dwarf-like and still in my budget. Then I realized that Viking outfits are fairly similar to dwarven ones and made a tunic based on traditional Viking clothes.
First, I bought a large black sweater from a thrift store and turned it inside out to make markings on it. (Have I mentioned how much I love thrift stores? Visit many and visit often, and you'll find all kinds of amazing things.)
I tried it on Jim, then made marks a bit below where I wanted the sleeves to end. Then I chopped off the sleeves about halfway down.
I chopped off the neckline and made an outline of what I wanted the neck to be.
I found some awesome ribbon trim for cheap online, and used it on the edges.
First I hemmed the neck and sleeves to avoid fraying.
Then I used silver thread on the top and bottom borders in order to invisibly attach it.
Now that my tunic was finished and my chainmaille sewn on, I attached the t-shirt sleeves to the inside of the sweater to make one whole shirt.
I sewed the sleeves on with black thread, right above the ribbon in order to be as unobtrusive as possible.
When the whole thing was assembled, it looked something like this:
I also bought a huge bag of leather strings from the Hobby Lobby for $5, so I dug through until I found some that fit.
And with the finished costume, I think it looked pretty authentic.
Add the $3 plastic Halloween axe (also from a thrift store) that I blessed with dwarven runes in silver Sharpie...
(what, like you didn't learn Angerthas in high school because you were geeky and bored?)
And I think he looks like a great dwarf.
The cloak and beard added to the effect as well. (He enjoyed growing out his beard far too much)
And here we are at the night of the premiere!
Well, hope that helps you with your own dwarf costume, and happy Hobbiting everyone!
Currently doing a project that involves compiling fortran files to run from python, using the f2py module. The central fortran subroutine has a call to a debug option, which spits out *.dat files describing what's going on under the hood.
From a workflow perspective, I decided that it would be neat to be able to include a "clean" option in the makefile for removing data files associated with debugging, without doing the other things that a typical "make clean" command does (removing module libraries, etc). Naturally, I named this option "datclean".
Only a few hours later did I realize what I had done: make datclean
Mostly because I couldn't find any other tutorials about making hobbit feet, and I didn't want to spend $30 on plushie feet that honestly look pretty strange. There was much searching of the internet, but the only results for how to knit hobbit feet were for one tutorial on Proudfeet baby booties (awwwww) and a book of knitting patterns that I didn't want to buy. So, being the naive crafter I am, a friend taught me exactly two crochet stitches a few days before, and I thought... "You know, I could probably figure out how to crochet slippers. It can't be that hard, right?"
And it wasn't!
Well, I had to learn a couple other crochet techniques, but I got them done! And you can too!
See? Don't they look so nerdy and awesome?
For this project you will need:
Yarn that matches your approximate skin tone
(I'm apparently too white for Oatmeal or Wheat, so apparently in yarn colors, I'm Beige. Yay.)
'Fun Fur', which is yarn that has fuzz all along one side. This will be the hair for your hobbit feet.
A crochet hook (I used a size H or 5 mm)
Scissors
Video tutorial, because let's face it, I can't walk you through this on my own
The video tutorial I used can be found here, or just watch below.
Julia is European, but her English and techniques are great. She demonstrates the stitches pretty clearly, but in case you need more assistance, I've included videos I found helpful to go along with each technique. So, before we start, let's review the kinds of crochet stitches you'll need to know.
1. Chain stitch (and slip knot)
-super easy, makes a straight line
- place slip knot on hook, wrap yarn around the hook part, pull through
Video below
2. Foundation chain
- start of the slipper, should be the length across the tips of your toes
Video below (skip to 0:49)
3. Single crochet
- You'll be doing this stitch a lot in this project
4. Double crochet
- you only do this stitch at the very end, but I'll stick a video here anyways
Now before you feel scared and overwhelmed, I had no idea what crocheting was until a few days before I started this project, and if I didn't know what was happening, I would youtube or ask until I figured it out. So no previous experience needed.
This is the main video we'll be working from:
(I'll put the times with the steps for future reference)
Keep in mind, she's using a 3.5 mm hook and 3 ply yarn, while I didn't realize I had a 5 mm hook and 4 ply yarn, so I adjusted the number of rows to reflect my differing supplies (after making it all wrong first, as per my usual).
(Quick tip: Pull the end of the yarn from inside the skein, rather than the one on the outside. It'll decrease twisting, and it's a lot neater!)
Here we go!
First, as with all knitting/crochet projects, make a slip knot (0:15 - 0:28)
Chain 2 (0:29 - 0:46)
Make a foundation chain of 10 (or however many it takes to cover the tips of your toes) (0:46 - 2:40)
Here, she talks about the size, which for her is a European 39, which is US Women's 8 1/2, but keep in mind the difference in yarn and hook size, so I say put it across your toes to measure, and if you need more or less, adjust accordingly. (2:41 - 3:15)
Make 3 single crochets in the same hole, also known as 3 increases. This will build out the chain and make the curve you see below. (3:16 - 4:09)
Now make 8 single crochets in the rest of the chain. (Optional: She mentions using two loops to make the sock thicker at the toe, which basically means sticking your hook in the first hole, then looping over to include the next hole, and pulling the yarn through the common space, like the connecting section in a Venn Diagram. In order to make sure you don't decrease and treat two loops like one, be sure to use the hole your treated as your second Venn Diagram circle again for your next stitch. If you didn't understand that, pretend I didn't say anything and just single crochet 8 stitches.) (4:10 - 5:30)
Now, increase by 3 at this end. (5:31 - 6:14)
Make 8 single crochets (normally now, if you did the double loop before) (6:15 - 6:53)
This time, only increase by 2. (6:54 - 7:12)
Then make 1 single crochet (7:13 - 7:18)
Increase by 2 again. (You're basically widening the curve so that the sock/slipper will go around your whole foot.) (7:19 - 7:33)
Now do your 8 single crochets around again. (7:34 - 8:03)
Increase 2 (8:04 - 8:20)
1 Single crochet (8:21 - 8:26)
Increase 2 again. (Now we're balancing out the other side!) (8:27 - 8:42)
Again, 8 single crochets (8:43 - 9:16)
And now, we're done with the base! She says to make 15 rounds of single crochets, but really, crochet however many rounds it takes to get to the middle of the top of your foot (not the middle of the sole of your foot - we'll be crocheting for that later.) (9:17 - 9:41)
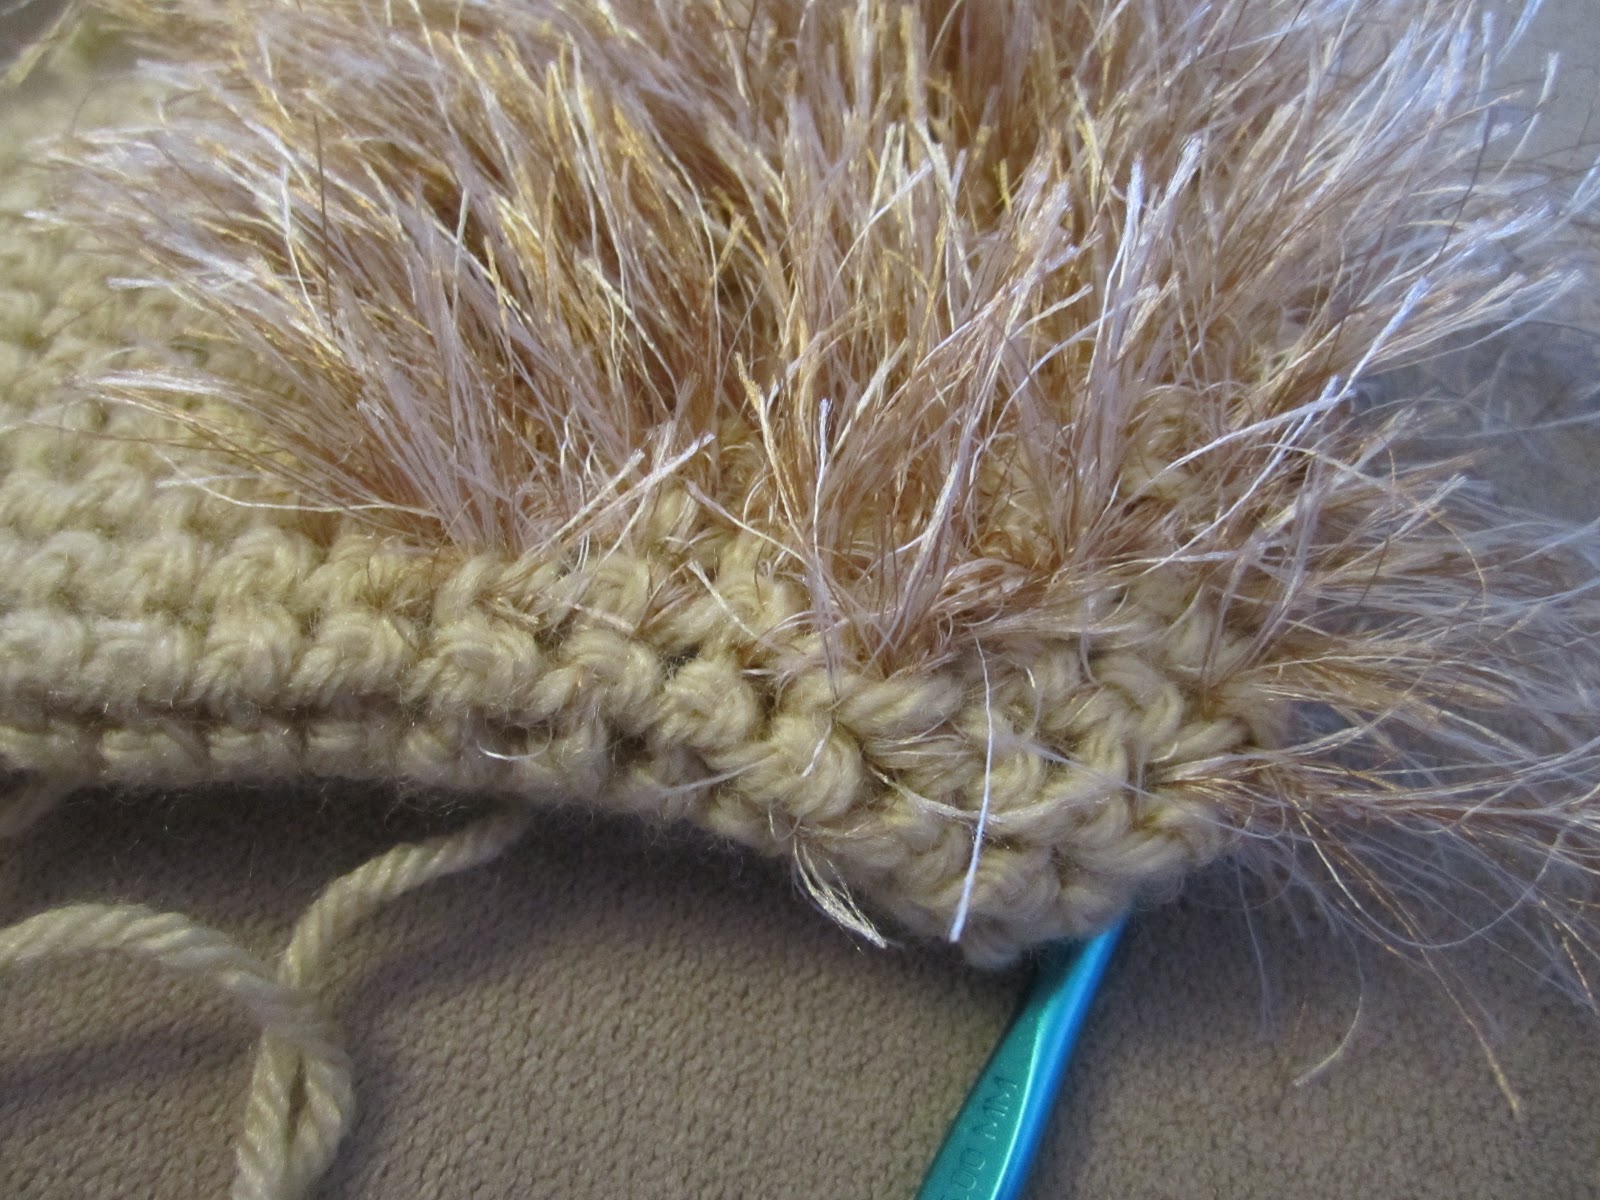
Now, this is where I add my own instructions in. To get the furry effect of hobbit feet, about 8 or 9 rounds in, wrap the 'Fun Fur' around your yarn, and treat it as if it's all just one string. You can make a slip knot with it on the previous stitch to keep it in place, if need be.
Now, choose which side will be the top of your slipper. I decided to let the side with the string go next to my pinkie toe, so I could see and remember it, but it doesn't really matter.
Fold your little pouch in half, and give it two or three stitches on each side, so that the 'hair' is on the top center of the slipper, and start crocheting your 'two for one' yarn. If you've followed the strict instructions, you should have 24 stitches all the way around, but I fudged some and ended up with 27. I figured 14 stitches per top side, took off two per side for allowance, and thus crocheted 10 stitches with my 'Fun Fur'.
After however many stitches wide you want your hair to be (10 for me), drop the furry yarn and crochet the bottom as usual until you get back up to the furry top again.
Once you get back up to the top, stitch your margin 2 or 3 stitches as usual, then pick up the furry yarn from the other end and join it to your wool yarn, making sure that the straight section from one end to the other isn't too tight.
Then continue on as usual. If you miss or add the yarn to an extra stitch, it's not a big deal, as it'll be hard to tell unless you look really close.
Crochet as many rounds as it takes to get to the middle of the top of your foot, and now we're going to increase again.
Crochet around to the top, then do the math in order to leave 8 stitches in the middle. So if you have 14 stitches, work three, then start on the increasing. (9:42 - 10:18)
Increase 2 (10:19 - 10:35)
Single crochet 1 (10:36 - 10:41)
Increase 2 (10:42 - 10:50)
Single crochet 1 (10:51 - 10:56)
Increase 2 (10:56 - 11:05)
Single crochet 1 (11:06 - 11:15)
Increase 2 (11:16 - 11:25)
Single crochet (11:26 - 11:33)
Having worked all 8 of your middle stitches, go ahead and finish off your row. (11:34 - 11:44)
Also, if you have cats, be warned that the moving furry yarn is very tempting.
If the side with the 'hair' is a bit longer and thicker than the bottom part, don't worry. We'll fix that in a little bit.
After the increase, go ahead and crochet however many rounds it takes to get to the front of of the ankle. She says 20 rounds, but again, keep in mind the difference between hook and yarn size, and just go until it reaches where your leg reaches your foot. (11:45 - 12:40)
Here you can see the margin of 2 stitches I used for my hobbit hair.
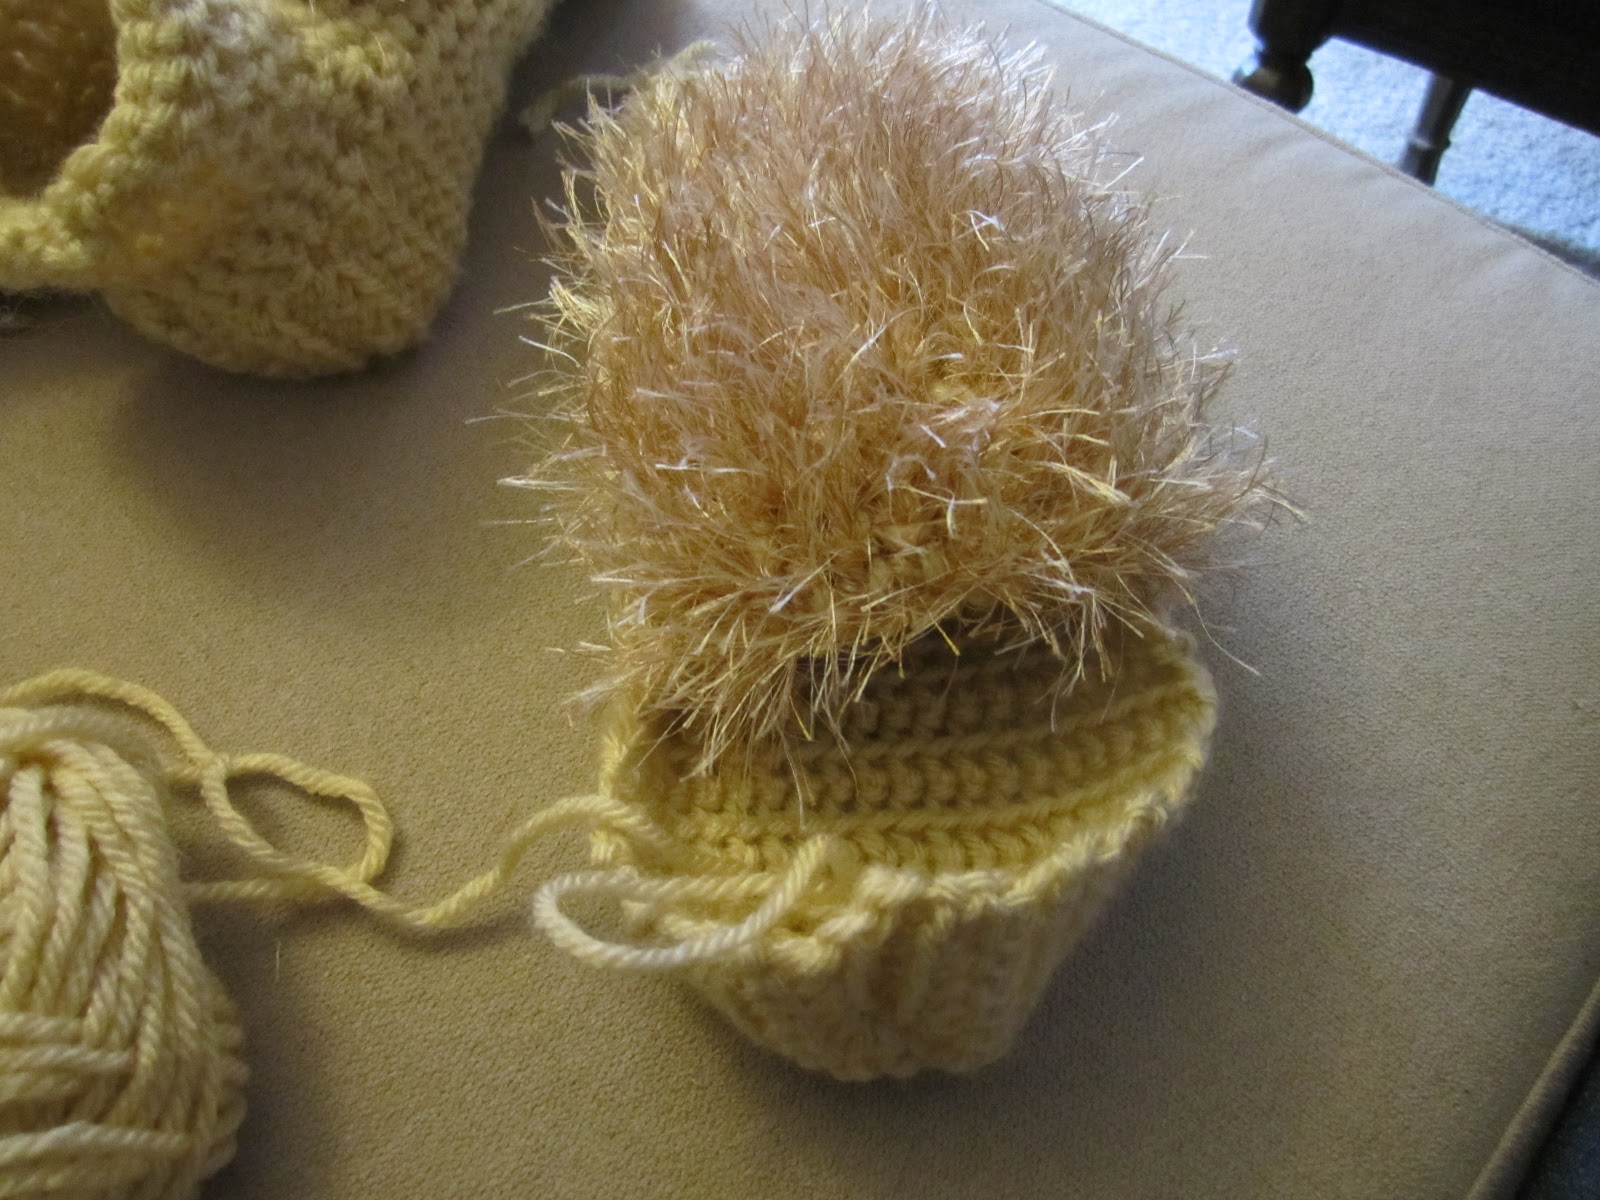
At this point, it was rather late at night, and I couldn't help but notice that my slipper looked a lot like a hedgehog puppet with a snotty nose. Pippin was unimpressed.
So, at this point, all you have is a crocheted tube (She talks about this between 12:41 and 12:58). To make it into a sock, we're going to add a flat heel section, and then make the sides come together. Just you watch.
Now that your tube covers the top of your foot, you're done with the fun Hobbit hair. Cut it, then knot it so it doesn't escape, and prepare for the next step. Don't worry! We're halfway done!
Here's how we make the flat heel bit.
Start at the side, and leave open 11 stitches in the middle of the top side. So if you have 27 stitches, we'll be crocheting the remaining 16. Crochet in from the side until the math works out (if my half was 13 stitches across, I start at the side, then crochet in one, so that the 11 stitches are in the middle, coming up one stitch on each side). (12:59 - 13:47)
Now we're going to crochet back along the way you just came.
Chain 1 (13:48 - 13:57)
Then turn your work around so you can see what you're doing. (13:58 - 14:02)
Start crocheting not in that first stitch (the one you just chained) but in the next one, and keep going until you reach the other side of those open 11 stitches. (14:03 - 14:29)
Do it all again!
Chain 1, turn your work, then crochet all the way back (14:30 - 15:10)
Do this for 10 or 11 rows, or however many it takes to have two or three rows going past your heel. (15:11 - 15:38)
Now's where we take it up, up and away! Also known as decreasing.
You'll need 4 stitches in the middle to do 2 decreases, so crochet in however many you need just like normal. (Mine was 16 across, so I chained 1, then crocheted 6 stitches in). (15:39 - 17:25)
Here's where we decrease. Stick your hook into a stitch just like normal, yarn over, pull back, but before you yarn over again and pull it through the two loops you have, stick the hook through the next stitch, yarn over and pull through so that you have 3 loops.
Yarn over, and pull the yarn through all 3 loops, making a decrease. (17:25 - 18:01)
Make 1 more decrease (18:02 - 18:26), then crochet the rest normally (18:27 - 18:37). What this is doing is creating a curve for your heel (see below) and building up the bottom of the sock.
After making this first row, do 3 more rows with decreases, 4 in all. (18:38 - 18:49)
Here's where we stitch it all together. Turn the flap inside out, so that the bottom sides are facing each other. (18:50 - 19:10)
Stick your hook through the stitch on the opposite corner, yarn over, and pull it through both loops. *Not* a single crochet. This is known as a slip stitch, and you're basically sewing the seam together. (19:12 - 19:42)
Put the two sides together so that the stitches match up, stick the hook into both stitches and pull it back through all the loops you have. (Details: put the hook through the next stitch and the one parallel to it, yarn over, pull through both stitches, then back through the loop on your hook. She explains it much better in the video at 19:43 - 20:08)
Do this for the rest of the stitches. (20:09 - 20:35)
This is where she casts off (20:36 - 21:12), but I don't like the commitment of calling that perfect and cutting the yarn. It just feels so permanent. Plus, what if I put it on and it doesn't fit?
To avoid casting off, I just put my hook through a stitch up top...
Yarned over...
Pulled through, and *boom*, I can continue with the pattern without cutting anything.
Now at this point, you have a slipper (21:13 - 21:34), so if you want to call it good here, go for it. I like some support around my ankles though, so I continued with the pattern.
(Also, if you just kept the same yarn going, you can avoid the messy part about hiding the yarn, attaching a new one, and making a new loop that she does for 21:35 - 21:55)
Crochet normally until you get to the corner of those original 11 stitches you left open and the nicely curved part of the sock you crocheted. (21:56 - 22:34)
You're going to use the 2 stitches that make up the corner as 1 decrease. (Remember, a decrease is basically one single crochet with you forgetting to yarn through your two loops, and then you go for the next one anyway and pull the yarn through all three.) (22:35 - 23:21)
Then single crochet normally across the top until you get to the other corner. Use the corner stitches as your decrease again, and you'll want 4 rounds of this. So, crochet 4 rounds of single crochets while decreasing in each corner. (23:22 - 23:54)
Again, this is a slipper with a tighter mouth, so if you think that's good, totally up to you. Cast off (ie, cut your yarn and pull it through your loop to make a slip knot), and enjoy your slipper. For more support, please do read on.
After 4 rounds of single crochets with decreases in each corner, we're going to build up the height of the sock with double crochets.
Chain 2 (23:55 - 24:17)
Double crochet (Yarn over before you go into the stitch, then yarn over once you're through, and pull back. You now have three loops. Yarn over, pull through two, then yarn over and pull through two again, now making just one loop.) Demonstrated at 24:18 - 24:48.
Double crochet around until you see the 3 free stitches from your chain and first double crochet. Now we're going to connect them. (24:49 - 25:02)
Do a slip stitch through the third stitch you see going up, and pull it all the way through, basically connecting the two top stitches. (25:03 - 25:24)
To start the next row, chain 2, then double crochet all the way around until you reach the three stitches that slope up. (25:25 - 25:51)
Do that until your sock is as tall as you want it (I only did 3 rows), and then do one last round of single crochets. (25:52 - 26:07)
Don't chain for this row, just do single crochets all the way around for however many rows you want, then when you complete the last row, cut your yarn (leaving a bit of a tail), and pull the tail through the loop. (26:08 - 26:36)
This will make a knot, and you can either knot it a few more times and cut it, or weave it into the rest of the sock.
And now you're done! Repeat everything again, and now you have two beautiful hobbit feet slippers, all ready for the Hobbit premiere (Dec 14th!!!!!!) or for any geeky gathering.
Pippin was very interested in my new fuzzy feet and in my cloak.
Here is my completed outfit!
Thanks so much for reading, and if you have any questions, feel free to ask in comments and I will try to answer them the best I can.