Pages

Friday, January 16, 2015

Petyr 'Littlefinger' Baelish Costume

I present to you, Lord Petyr Baelish!

(My friend would like to note that he only wore the Hand of the King pin in the picture for party reasons, and he has now acquired the mockingbird pin and so will be a much more accurate version of Littlefinger for any future photos)

For Halloween, one of my friends commissioned me to make him a Petyr 'Littlefinger' Baelish costume for a Game of Thrones party we were going to. After doing some research, I settled on a long tunic with an overcoat he wears in season one.

While at a fabric warehouse sale, I stumbled upon the perfect material for both the tunic and the overcoat. So for $1 a yard, I snatched up 5ish yards of the lighter leaf-embroidered fabric, and 1ish yard of the heavy woven fabric, for an unbelievable total of $6!


For the tunic, I used the out of print Simplicity 5386 Matrix coat pattern, which I ordered off of Amazon. Butterick Men’s Robe pattern (B6844), which is in stock, would also work.


The pattern came together pretty easily (besides the sleeves. Sleeves are made of evil), and before long, I had a nearly finished tunic on my dress form! My cat also decided that the tunic was her new hiding place, and she was going to live there now.

Look Mommy, I found a tent! Now close the door!

Once assembled, I tried to figure out the best way to join the front pieces together seamlessly. I didn't want to use a zipper, couldn't find a way to make magnets work, and was temporarily stumped until I remembered a handy contraption I had seen online.

Hook and eye tape!

None of the fabric stores around me had hook and eye tape in stock, but I was able to find and order it from Amazon (link here). This worked perfectly, although it took a lot of tiny adjustments to make the two sides meet up, and may take a few minutes to hook together, it achieved the look I was going for.


I ended up sewing the hook side flush against the edge of one side, with the outside of the eyes against the edge of the other side of the fabric. The tape goes from the throat to halfway down the rest of the tunic.

Once the tunic was finished, I moved on to creating the overcoat. I cut the whole section of fabric in half lengthwise, so I had two long, skinny pieces to work with. I sewed the back half together, stopping right at the nape of the neck.


In the actual costume, Petyr has three folds in his overcoat, then gold trim down each of the folds. Since the coat changes size as it comes off the shoulder, this meant I got to do some hand draping to make sure the sections stayed proportional all the way down.


Starting the draping/folding process.

So. Many. Pins.

The middle section is folded in order to make the lower portion hang straight, with more fabric tucked up on the outside edge until it's no longer crooked. Once both sides were folded and straightened, I added one hook and eye to the center of the overcoat so it would stay together.


I didn't have time to add gold trim to the edges, but I might do it in the future if he wears it again. For the belt, I found some brown leather string and attached it to a silver clasp. Put it all together, and it looks amazing!


Please let me know if you have any questions, and happy crafting!

Tuesday, January 13, 2015

Things I Made in 2014

We're only halfway through January, so it's not too late to do a 2014 review post right?

Right.

Crafts are split up into the following categories (click to jump to that section):

Personal Projects
Costumes
Gifts

I craft a variety of different things for different purposes, but let's start with the one that took me the longest.

Personal Projects:

Tardis Blanket:

Pattern: Blue Police Box Pattern from Ravelry by Sandra Petit

Materials: So many skeins of blue yarn. So. Many. If I had to guess, I'd say 8, maybe more.
1 skein of white yarn (for box and lantern)
1 skein of gray yarn (for windows)
2 skeins of black yarn (for outlines)

Time: 2 years, off and on. (Started November 4, 2012, finished May 18, 2014)

Measuring over six feet tall, I started this way back in November of 2012 and crocheted it off and on ever since. It was my fist big crochet project and established my habit of needing something to work on while watching tv. I might still embroider 'Police Box' and the 'Pull to Open' sign, but I consider it pretty much done.

The finished product!

Book Tree:


Materials: I used a lot of books, so it really depends on how tall you want it. I think I used about 100-150 books and mine was about five feet tall.

Time: 2.5 hours.

We wanted a tree for the Christmas season, but since we were going to be gone, and our cat was going to be by herself, we needed a tree that didn't require watering and that Pepper couldn't knock over.

Voila! The most geeky solution!

Bonus points for adding geeky ornaments!


Costumes:

Steampunk Fem!Indiana Jones:

Pattern: Duct tape whip tutorial from Skip to My Lou

Materials: All thrifted items; Hat, jacket, two brown skirts, my Frankenshirt, whip made of brown duct tape braided over a jump rope, leather bag, plus goggles!

Time: As long as it took to find all the items at thrift stores and con my friend Carissa into braiding the whip for me

Made for the first day of AnomalyCon 2014, I had a lot of fun putting this outfit together.


Steampunk Tinkerbell:


Materials: Corset from Corset-Story, 5 yards of green satin for the skirt, 2 yards of bronze contrast fabric, thrifted shirt, belt, boots, and homemade flight pack!

Time: 2 months

My main costume for AnomalyCon 2014 (hosted at the end of March), I started this costume in the beginning of February, although I had been keeping my eye out for steampunk items at thrift stores for quite a while. I made my own wings and flight pack, and collected things to hang on my belt (tinker's tools, a genie's lamp, a spyglass, etc). One of my favorite steampunk outfits. Read the full tutorial here.
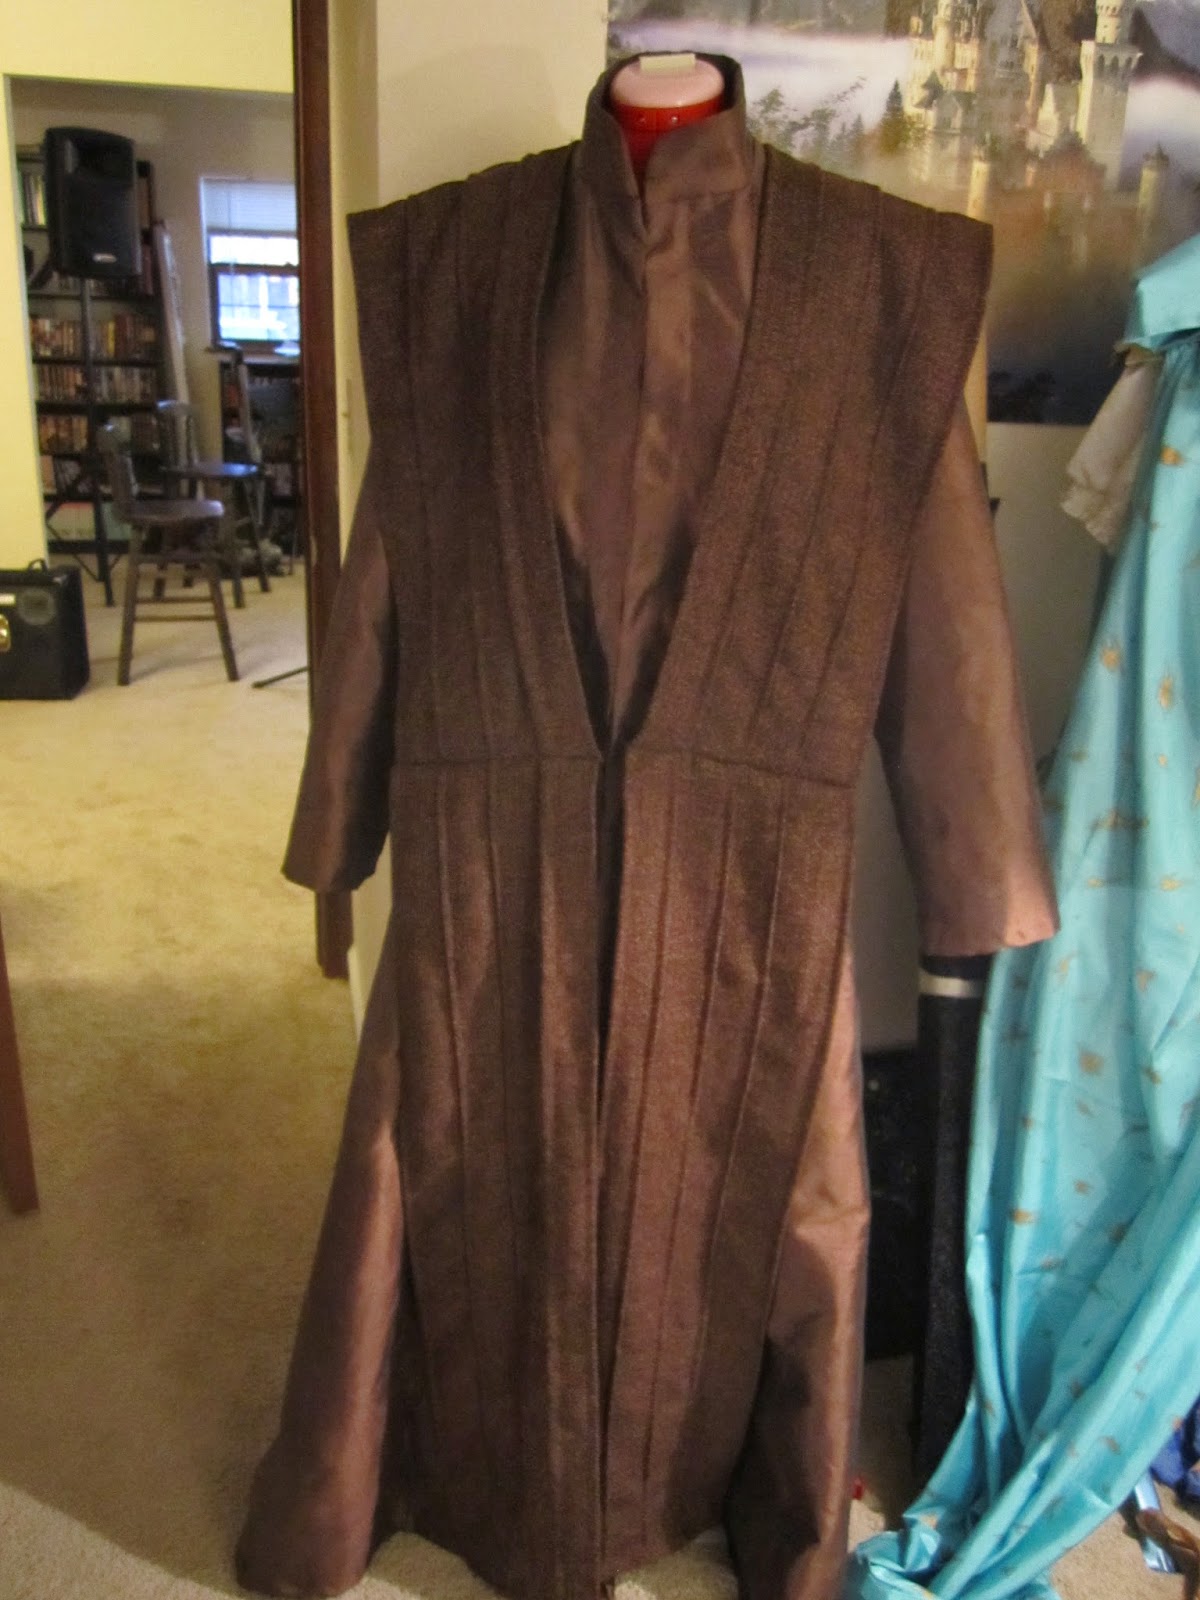

Steampunk Riker:

Pattern: Simplicity 2333 (Mad Hatter, Captian Hook jacket), inspired by citizenkanev on Deviantart

Materials: 4 yards of red wool, 1 yard of black wool

Time: 1 month

Made for Jim to wear for AnomalyCon 2014, I saw citizenkanev's amazing costume on Deviantart and convinced Jim to come with me if I made it for him. I learned a lot about construction and using a muslin, and how evil sleeves are during this project, but enjoyed creating this all the same. You can read the full tutorial here.


Eowyn (Lord of the Rings):

Pattern: Simplicity 4940

Material: 7 3/4 yrds of white crepe suiting, 7/8 yrd of brown suede

Time: 4 weeks, more or less

One of my favorite characters from Lord of the Rings, I decided to make Eowyn's iconic dress for the 2014 Denver Comic Con in June. You can read the full tutorial here. I also got to wear it again for a post-Christmas photo shoot with my two nerdiest friends!


Rose Tyler (Doctor Who):

Pattern: None

Materials: Thrifted blue jacket, shirt, pants, and boots. Nerf Longshot borrowed from my brother Luke and painted by my friend Ian.

Time: However long it took me to find the blue bomber jacket at a thrift store. All the other pieces came together pretty quickly.

Rose Tyler is my favorite companion from Doctor Who, and I knew that I had to dress up as her for the 2014 Denver Comic Con. I must say, I felt pretty awesome! Full costume write up here.


Petyr 'Littlefinger' Baelish (Game of Thrones):

Pattern: Simplicity 5386 (Matrix Coat pattern, can also use Butterick 6844)

Materials: 5 yards of a jaquard-like fabric, 1 yard of a heavy woven fabric

Time: 3 weeks

A friend of mine commissioned me to make him a Littlefinger costume for a Game of Thrones party we were going to on Halloween. You can read the full costume tutorial here.


Jon Snow (Game of Thrones):

Pattern: None

Materials: Thrifted faux fur sewn on to a robe that was remade into a cape, with a cut up belt going across the chest.

Time: 1 day

Made for the same Game of Thrones party as the Petyr Baelish costume, this was much more haphazard simply done. Jim wore his dwarven shirt (minus the chainmail), and I wore a borrowed Daenerys dress. Overall, I think we look pretty good!


Galadriel (Lord of the Rings):

Pattern: Simplicity 1551

Materials: 3 3/4 yards of white satin, and lots of thrifted sheer fabric (5 yards-ish?)

Time: 2 weeks

Made for our Christmas Lord of the Rings photoshoot for my friend Melaine, I bought a lot of the sheer fabric that hangs behind curtains from thrift stores for $2 a pair, then bought 3.5 yards of white satin and realized it was just short of how much I needed. Nevertheless, I made it work, and I must say it turned out amazing for the amount of time I had! (Mostly due to the fact that Melaine is basically an elf already)


Gifts:

Fleece Football Pillow:

Pattern: Sporty Pillows from Parents.com

Materials: 1/2 yd of brown fleece, white shoelace

Time: 3 hours

Made for my friend's son's first birthday, I go to experiment with my embroidery machine for the first time! On a related note; always use stabilizer when trying to embroider fleece, or else it will chew right through it. Also, don't bother downloading the template from the website. Just cut out approximate football shapes, measure how long you'd like the laces to be, then make holes where it starts and ends.


Crochet Mr. and Mrs. Octopi:

Pattern: Octopode Pandemonium! from PepperKitty on Craftster

Materials: Less than 1 skein for each color

Time: 3 hours each

Made for a friend's baby shower, I knew they were decorating their baby girl's room in pink and brown, so I decided to make a pair of octopi! Mr. Octopus has a blue bowtie hot-glued to the front, and Mrs. Octopus has a matching hairbow.
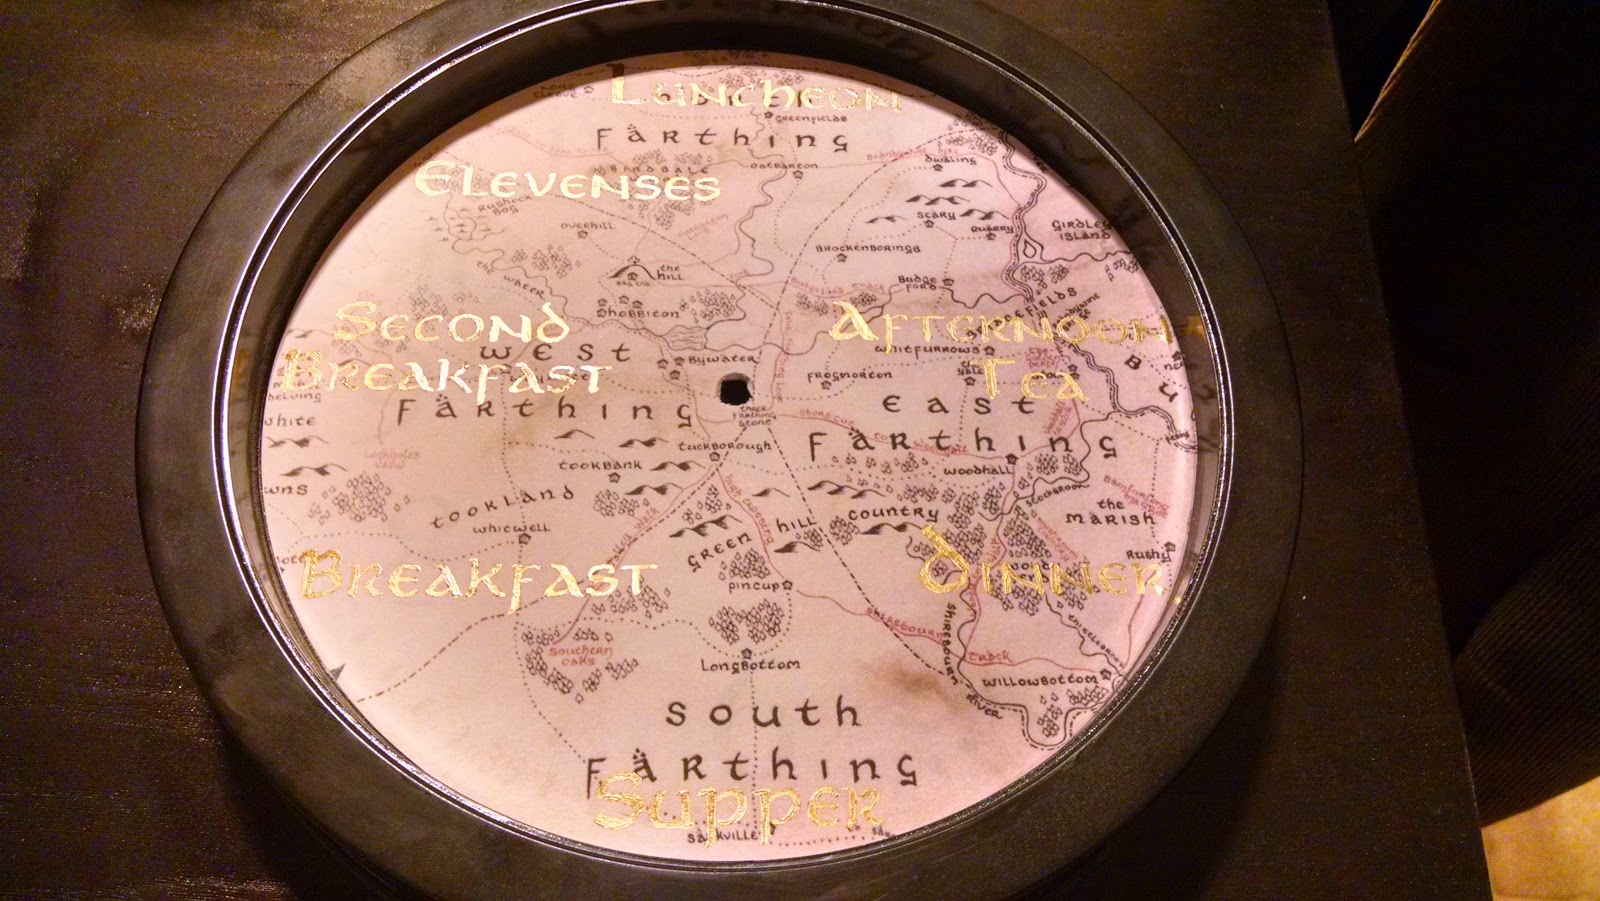
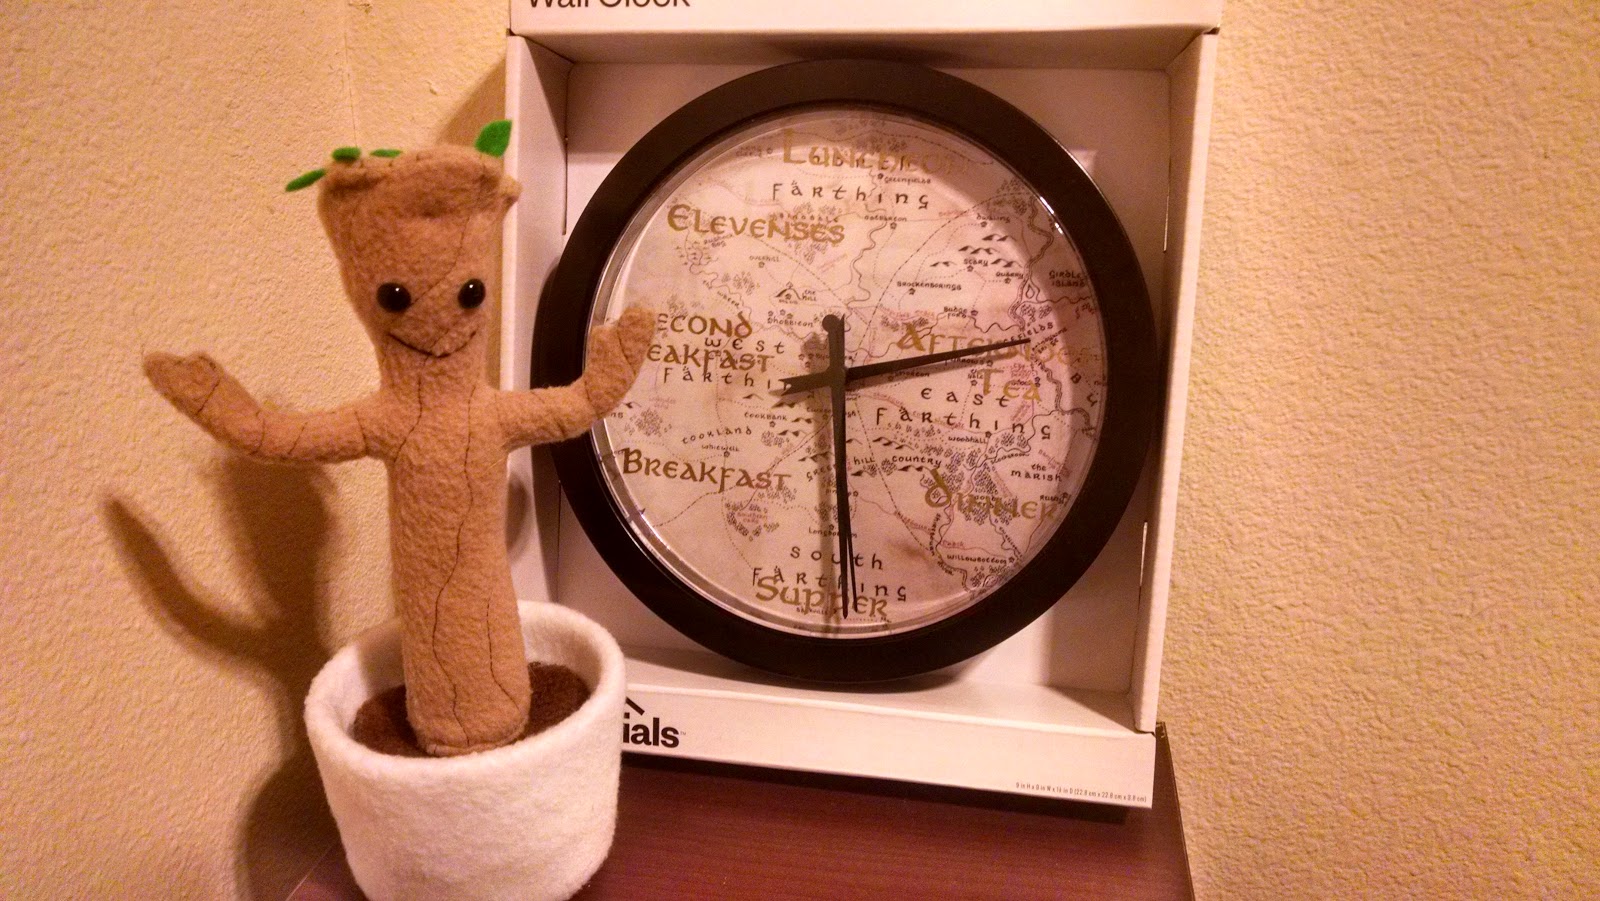

Hobbit Meal Clock:

Pattern: Hobbit Clock on Imgur

Materials: $5 Clock from Target, gold leaf pen, Map of the Shire, Aniron Font

Time: 4 hours (it took me a while to realize the face of the clock was attached with two prongs on the top and bottom and to pop it off)

A Christmas gift for my friend Amanda who loves making delicious food. Now, it's always mealtime! (Click here if you'd like to see Pippin recounting the different meals Hobbits observe.)
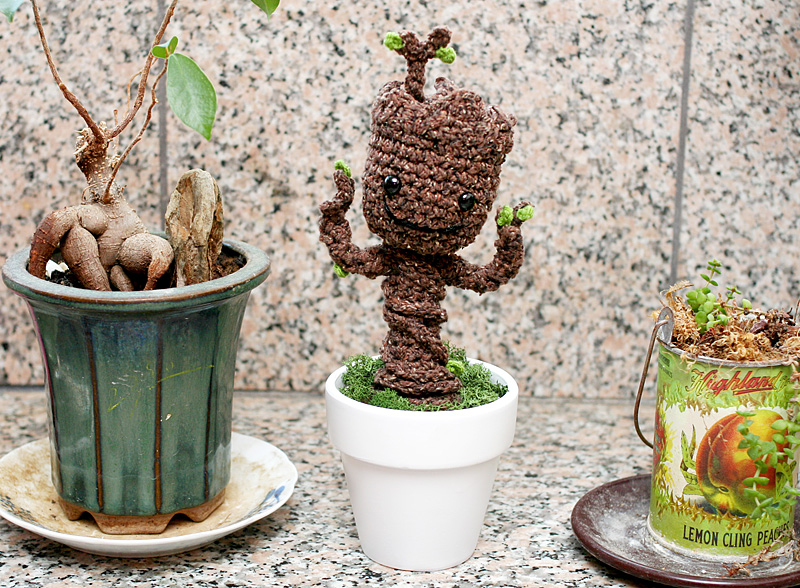
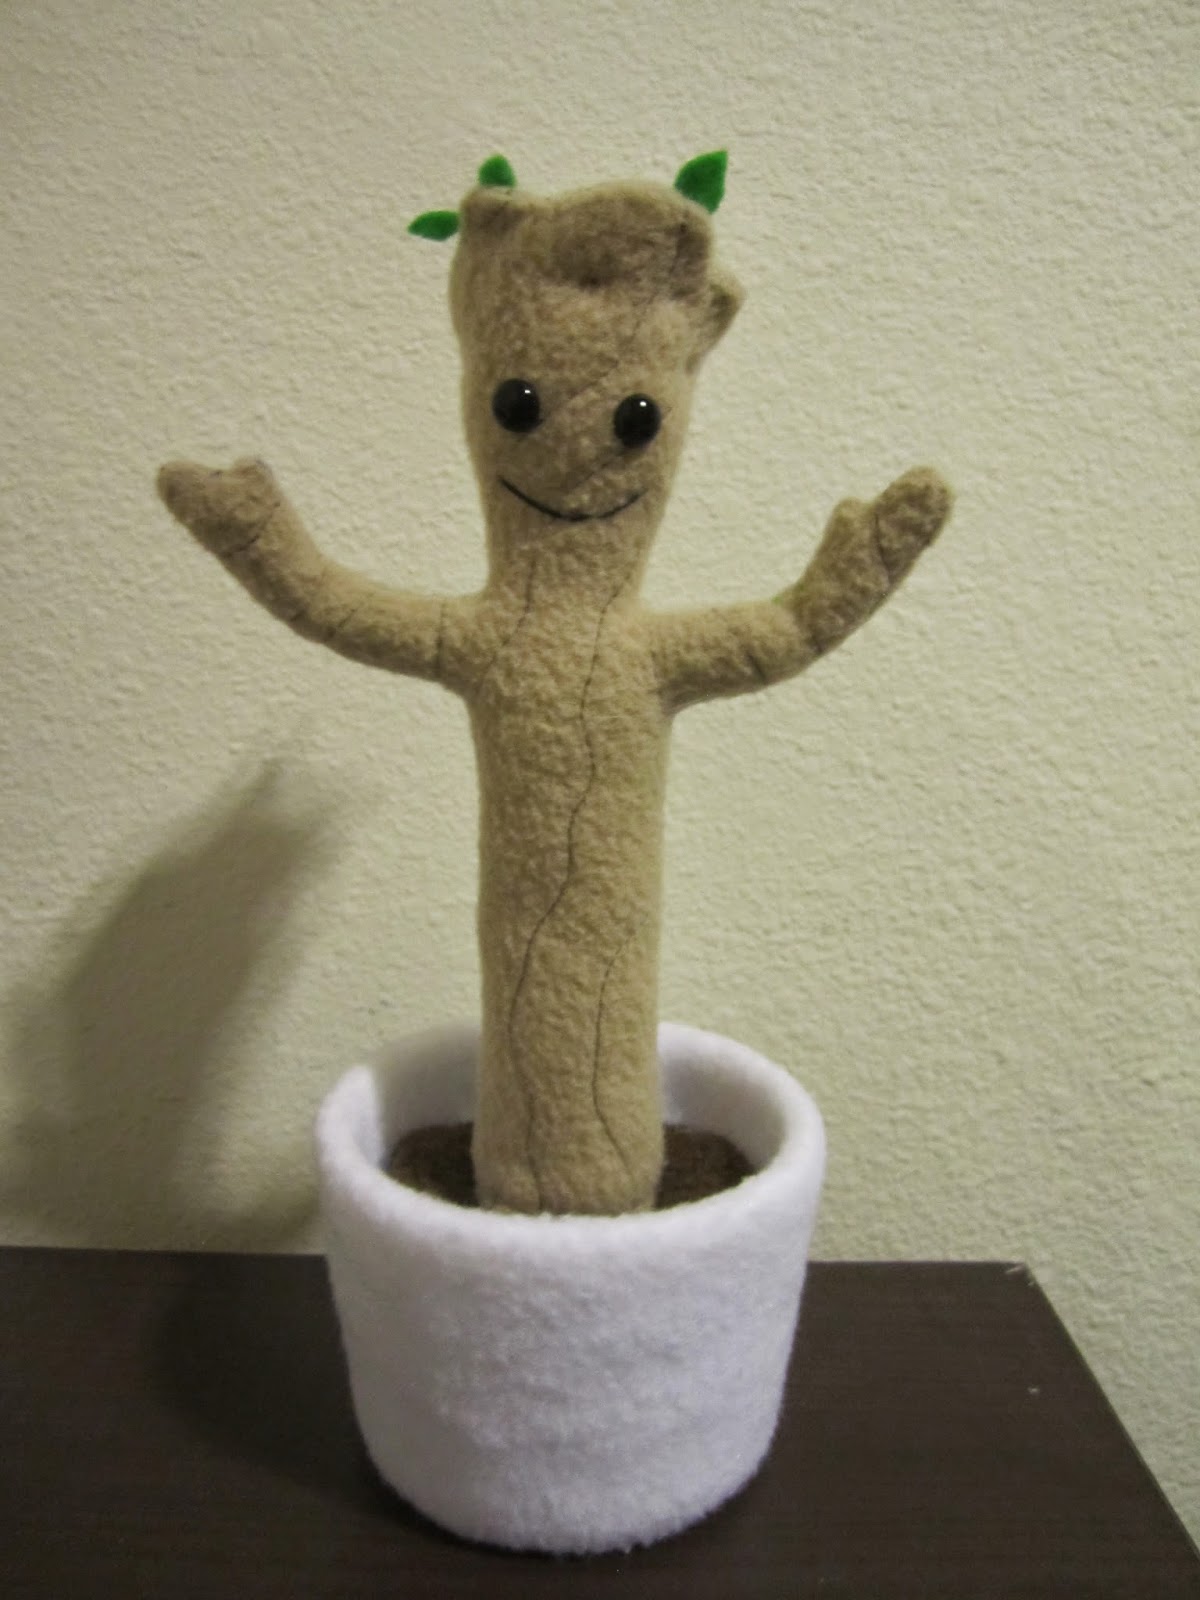


Baby Groot:

Pattern: A modified version of this stencil from MyRecipes.com

Materials: 1/3 yrd tan fleece, scraps of white fleece for the flowerpot, brown fleece for the 'dirt', green felt for the leaves, plus wire and safety eyes.

Time: 2 days

This was one of my favorite projects, mostly because it's first posable plushie I have ever created, plus when Groot posed next to the Hobbit Meal Clock, my heart nearly exploded with geeky happiness. If you'd like to create your own baby Groot, see the full tutorial here.


TARDIS Baby Blanket:

Pattern: A modified version of Blue Police Box Pattern from Ravelry by Sandra Petit

Materials: 2 skeins of blue, 1 skein of black, less than one skein of white yarn

Time: Around 6 months, off and on

Once I heard that some good friends of mine were having a baby girl named Clara, I knew that the baby needed her own Tardis blanket, until the Doctor could come sweep her away. I was so familiar with Sandra's pattern that I really did this one from memory. I added a black background to make it wider, then embroidered Clara's name on the top left corner.


Ellie-Saurus:

Pattern: T-Rex Softie Tutorial and Pattern by Made by Enginerds

Materials: 1/4 yd argyle fabric, scrap of minky fabric, ric rac, and safety eyes

Time: 5-6 hours

Made for a good friend's daughter's first birthday, I was inspired when Ellie kept roaring at things, and quickly realized she needed her own Ellie-saurus to play with. I modified the pattern slightly to move the arms on the sides of the belly, instead of up by the neck, and used safety eyes for a more complete look.


Friday, January 2, 2015

Baby Groot Plushie Tutorial

I am Groot!

Hello there! If you've seen the Guardians of the Galaxy, then you'll know that one of the cutest things in existence is the dancing baby Groot at the end. When one of my friends mentioned that she would love her own Groot plushie, I started to search the internets for tutorials on how to make one. And while there are many wonderful crochet (and cupcake!) versions out there, there were no plushie patterns to be found.

Baby_groot_-_free_crochet_pattern_small2 GrootDance3sm
Adorable Crochet Groot pattern from Smartapple Creations (left) and Twinkiechan (right)


Groot Cupcakes by Koalipops on the Myrecipes.com Youtube Channel
(They graciously provided a great Groot stencil we'll use in a minute)

As Christmas drew closer, I knew I had to start on Baby Groot soon (read: four days before Christmas), so I figured I'd just have to wing it, document the process, and hope it worked out.

I like to think it worked out surprisingly well.

Don't you just want to cuddle him?

So, to make a plushie Groot of your very own, you will need the following items:


About 1/3 yd of tan fleece
Dark brown fleece or felt for 'dirt' in flowerpot
Magnets (I broke mine out of two Dollar Store magnets)
Material to use for flowerpot (I used a cream cheese container)
White felt or fleece for outside of flowerpot
Green felt for leaves
Decorative Aluminum Wire (Mine was 12 gauge)
Wire cutters
Scissors
Hot Glue

First, I wanted to imitate the look of an actual tree, and since there are no easy instructions for how to get fabric to look like bark, I sewed over my fleece at an angle and just turned the fabric back and forth at random to create wavy lines. I tried both matching and contrasting thread, and thought the dark brown thread looked the best. In the movie, he has green lines as well as brown, so feel free to experiment with colors on your own!


Once the fabric was cut and ready, I cut out the stencil from the Koalipops, adjusting it slightly to make the arms longer and to exaggerate some of his head grooves, then traced it out onto the fleece.

Since I knew I was not talented or lucky enough to have drawn the arms the same length, I cut out half of Groot, then folded him over and retraced the arm so it would match.


Once I cut out one side, I traced it out on another piece and stitched up the sides, leaving the top and bottom open.

He looks like a gingerbread Groot!

In order to make Groot three dimensional, I added a section between the open halves of the top. So that it would dip down, I sewed two scraps together in a wide 'U' shape, and then tucked it between the two top pieces and sewed along the edges of the bumps and grooves. You can also trace the edge first, and cut second, but I found cutting after a bit easier.


Once the top was attached, I turned him inside out, using a pen to push out the arms and the smaller bits of the head bark. I then added safety eyes (found at Joann's near the bells and glitter, for some reason).


This is the part where a normal person would sew on the smile, but... I forgot and had to sew it on when he was mostly done, which was interesting (read: difficult). So if you're making your own Groot, sew his smile on now. 

In order to make him posable, I looked up several tutorials that suggested making a rough wire armature. I had some decorative wire left over from my steampunk Tinkerbell wings, so I used that. I cut one piece of wire slightly longer than both arms across, and bent the tips so that the ends wouldn't poke out of the fabric. Afterwards, I bent a long wire in half and twisted it for the main support, and then wrapped the leftover wires in between the arm wire and the body wire to keep the arms where I wanted them. 


After partially stuffing the head and arms, I moved the arm wires up (as if he was doing the 'Y' in the YMCA dance), and settled the armature inside. I filled out all but the last two inches or so of Groot's body with polyfill stuffing, leaving room for some heavier elements so he can stand up on his own.

The first stabilizing element I added was a small packet of rice, which I made with the leftover scraps of the tan fabric, but you can really make it with any kind of fabric.


I untwisted the lower part of the wire to make room for the rice, then added a few washers I scavenged from our garage to have a metal base for the magnets to attach to. You could also insert a magnet into the base, if you want to.


After adding the rice packet and washers, I twisted the wires around to keep the washers in and to make a flat surface so Groot can stand on his own.


After making sure he could stay upright, I added some scraps to fill out the rest of the base, then sewed on a circle to complete the body.


Now that Groot himself is done, let's tackle his flowerpot!


I looked around my grocery store for containers about the right size and settled on the cream cheese tub (plus, we had an excuse to make cream cheese dip!). After washing it, I traced it out on felt to make a pattern piece for the bottom and a curved piece to go around the sides. I left several inches extra on top so they could go over and down into the flowerpot.


I cut out the pieces in white fleece, and then sewed the sides together, and then to the bottom circle. In order to fit it as snugly as possible, I left the fabric inside out and inserted the cream cheese container to see if there were any loose sections, then made adjustments from there.


Once the fleece cover for the flowerpot was done, I broke open the two Dollar Store horseshoe magnets to get the squares of the actual magnets. I used all four magnetic squares, but it depends on what you have in the base of Groot, and what strength and size magnets you have. You can also buy magnets at crafts stores that are bigger than this, if you prefer.


After tucking in all the sides into the flowerpot, I trimmed the fabric to where I wanted it, then hot glued it to the inside. Once that was dry, I added rice until it was about 2/3rds full.


For the 'dirt', I traced the top of the container onto some brown fleece I had, added some allowance to it, then cut it out. Before I hot-glued the magnets to the underside of the fabric, I made extra certain that the polarity was not reversed (sorry, I just had to. Other Whovians will understand), and that the magnets were strong enough to hold Groot through two layers of fabric.


I then hot-glued the brown fleece with the magnets underneath to the edges of the flowerpot, and got to put Groot in his little home!


For the finishing touches, I tacked parts of his head to the sides to help it stay down, which also gave him a little bit of puckering on his forehead that I thought was a great effect.


To add a little more detail, I cut out small leaves from green felt and attached them at random to his head. Feel free to put as many as you like!


Now you have your very own dancing baby Groot! I took pictures and giffed them so he can do a dance as well!


Thanks for reading, feel free to as any questions in the comments, and happy geeky crafting!!

Here's for all my pinners!